
If you have even been in the situation where your Office 365 subscription has expired without you knowing, or you just wanted to find an easy way to keep an eye on your organisations license usage - you would know that currently there isn't easy to add sensor in PRTG to enable you to do this.
It is possible to do this with Powershell and a custom PRTG EXE Advanced Script sensor - although it's a little fiddly. There are a few areas where your script could error out. For example, invalid O365 credentials, missing powershell functions, and perhaps even the structure of the XML which your script puts down, is not accepted by PRTG. This can therefore quickly turn into a frustrating little project for you.
The good news is that perhaps we can save you some work! We put a little time of our own (just to set your expectation!) into building a simple powershell script which will enable you to query and report various metrics on your Office 365 subscriptions and import these into a multi channel PRTG sensor for you to monitor.
To get your free copy - all we ask you to do is to request it via the contact form below, and we will get right back to you:
CLICK HERE TO SEND US A REQUEST
For a live look at what the script outputs please see a link to our own PRTG installation which uses it below:
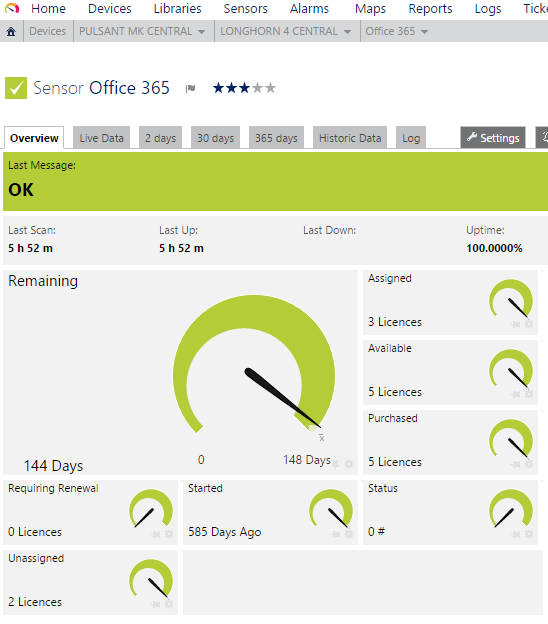
Above: a screen grab of typical sensor output
We are collecting the following subscription data from O365:
Days since subscription started
Days until subscription ends (the big one!)
Number of total licenses
Number of used licenses
Number of free licenses
There are many more possibilities, perhaps you an adjust out script to fit your needs. These we felt these were the most important KPIs to start with.
How to get it working!
1) Get PS Add Ins
So the first thing that you need to do is to decide which probe in your PRTG infrastructure is going to do the checking via Powershell. This is important because you will need to install a number of additional Powershell commands for Office 365 on that system which our script needs to work. Naturally all the standard disclaimers apply, back up your server before installing these just in case. There is a great page on the MS website which you can find HERE , on which you can download everything you need to get started.
2) Test your probe servers connection & authentication to Office 365
To start with I would recommend running a basic PS script which I have taken as a snippet from our existing script. On the server you have installed the add-ins, open up Powershell ISE and paste in the following code:
 $mycred = new-object -typename System.Management.Automation.PSCredential -argumentlist $office365,$pass

 Import-Module MsOnline

################################
# Compliance Centre Connection #
################################
 $O365Session = New-PSSession -ConfigurationName Microsoft.Exchange -ConnectionUri https://outlook.office365.com/powershell-liveid/ -Credential $mycred -Authentication Basic -AllowRedirection -WarningAction:SilentlyContinue

Import-PSSession $O365Session

Connect-MsolService -Credential $mycred
You will see a couple of errors complaining about username etc - but ignore these. Hopefully you will get an authentication box pop up. In this box you want to enter your O365 admin user email address and password. The box might pop up again, if it does, just re-enter your details.
Running this script doesn't actually output anything, apart from an empty Powershell window.
The next thing to do is to query O365 for the SKUs you have on that account - we need these details for the script. Back in your ISE enter the following:
Get-MsolAccountSkuJust type that in and run as selected in ISE. If everything has worked out you will be greeted with output in your PS window listing out your AccountSkuIds:
PS C:\Users\Administrator> Get-MsolAccountSku

AccountSkuId                                                                                          ActiveUnits     WarningUnits    ConsumedUnits
------------                                                                                          -----------     ------------    -------------
appcentric:AAD_PREMIUM                                                                                3               0               3
appcentric:ENTERPRISEPACK                                                                             5               0               4
So this is the output from one of our own O365 accounts. You can see that the particular tenant name is 'appcentric:' and we have two SKUs which are AAD_PREMIUM and ENTERPRISEPACK. Make a note of these outputs as you need them for our script.
Our script is multi channel so it can collect multiple outputs in a single sensor, however we thought as there is a limitation on the number of channels in a sensor, it would be best to keep things relatively simple and limit it to one SKU per script/sensor. So if you have SKU to monitor like we do, you would create two scripts, and just change the SKU variable, and select the right script when you create each sensor.
3) Modify our script to include your tenant name and SKU - taken from step 2) above
4) Save our script in the following location on the probe which will be doing the O365 checking:
C:\Program Files (x86)\PRTG Network Monitor\Custom Sensors\EXEXML\
This is the default install path, so change if yours differs.
We also recommend calling the script with the SKU in there - we called our scripts O365-ENT-PACK-SKU-V1 & O365-AAD-SKU-V1 for example. That helps when you are selecting the script when you create the sensor in PRTG..
5) Now you need to open the script and make those changes to the tenant and SKU variables - we've placed these at the very top of the script to make it easy to find:
##############
# Variables  #
##############

$tennantname = "appcentric:"
$sku         = "AAD_PREMIUM"
So just go ahead and replace your tenant name (ending in :) and sku to match your own.
6) Once done - you can now run the whole script (ignoring the errors again) and at the end you should see the XML output returned which PRTG will read. You will see in the XML data the information from Office 365 which you wanted to collect:
<?xml version "1.0" encoding="UTF-8" ?>
<prtg>
<result>
<channel>Started</channel>
<value> 231</value>
<CustomUnit>Days Ago</CustomUnit>
</result>
<result>
<channel>Remaining</channel>
<value> 133</value>
<CustomUnit>Days</CustomUnit>
</result>
<result>
<channel>Status</channel>
<value> Enabled</value>
</result>
<result>
<channel>Purchased</channel>
<value> 3</value>
<CustomUnit>Licences</CustomUnit>
</result>
At this point we know your probe server can talk to Office 365, and with the script, it's grabbing data from Office 365 and placing it in a format which PRTG is able to read. All we have to do now is to set up the sensor in PRTG.
7) In PRTG admin, find the probe which you are using to monitor Office 365, create a new sensor of type EXE/Advanced. In the EXE/Script drop down box, select your script. If you saved it in the right place (shown above) it should appear here. For testing (clear text passwords!) enter the following into the parameters box:
"your-o365-email-address" "your-o365-password"
Naturally use your email address and password, make sure you use the double quotes and you have a space between them as above. There is an option to create an encrypted password in the script too - but I would recommend for setup & initial testing, just use this, as it's one less thing to go wrong and therefore simplifies troubleshooting.
Make sure the 'Write EXE result to disk' is selected.
There are no other changes you need to make on the settings to make this work, you can change the scanning interval naturally / what happens if the sensor query fails etc.
If you have done all of the above, we are pretty sure - you should see the sensor go green after a while, and you can then start recording your O365 subscription usage, creating notification rules etc.
We're very happy to help out if you need assistance, just get in touch via our contact us form - or leave a comment in the box below, and we will do our best to get it working for you!
Aschwin Geisler - 13 March 2018 17:56
I got in touch to get the script. Instant response from Jeff. Followed the instructions above and got the script working without any problems. If everything could be as easy as this... Jeff, thanks. Thanks a lot.
Jeff Rhys-Jones - 13 March 2018 18:03
Hi Aschwin - many thanks for your kind comments - very pleased our script helped get your PRTG hooked up with O365 licensing... may your subscription never unexpectedly expire again!!!
François - 16 October 2018 20:33
Hi all, so I was looking for a script like this, and I tested it. For the record, if you're using Windows 2016 Server as your PRTG server, you might have to copy your PS folder from system32 to syswow64 folder to make it works. Some may say, good to know ! ^^ Amazing script a big thx to Jeff who took time to answer my mails :) It works just like a charm, didn't want to be surprised anymore by a Microsft bug making all my exchange licences unavailable... Thx Jeff !!!