
What's in a name!?
Allied Telesis are usually rather creative when coming up with their feature names.
There is AMF (Allied Management Framework), VC Stack (Virtual Chassis stacking), and how could we forget ‘EPSR’ (Ethernet Protection Switching Ring). However, when it came to the inclusion of ‘L2TPv3 Pseudo-wire support’ into their range of competitively priced and handily sized AR series of secure VPN routers, they opted for ‘L2TPv3 Pseudo-wire’. How disappointing!
As we have done in the past, we decided to offer a little helping hand and came up with our own alternative feature name for it: ‘Pseudo Noodle’. It sounds a little bit more ‘stretchy’, quick to prepare, affordable... and rather tasty! Perhaps our Pseudo Noodle name will help the capabilities of this feature 'stick' in the mind of our customers!?
Pseu-pseu-pseudio!
The concept of running Pseudo-wires (essentially running a point to point network service through other network(s) via transparent virtual 'wires') has been round a while, but still some time after Phil Collins wrote a memorable song about it in 1985. In the past it was more commonly used by ISPs / TELCOs for MPLS or legacy ATM backbone connectivity applications.
With the arrival of L2TPv3 things have got a whole lot easier, as secure pseudo-wire functionally is built right in to the protocol. Being far cheaper and easier to provision than MPLS, organisations (and perhaps consumer homes even?!) can now create geographically dispersed flat L2 networks which can essentially behave just as if you managed to reel out 530 miles worth of cable from your London apartment down to your holiday home in La Rochelle, France.
Perhaps you are thinking – what about VPNs? These have been around for ages right?
True, but then VPNs need to be carefully designed, and can be a pain to deploy. You require careful planning of subnets, routing and also NAT considerations – and not to mention vendor interoperability challenges too. It would always be easier to simply run a cable… and it’s the ‘Pseudo Noodle’ feature that enables you do (virtually) exactly this.
Allied Telesis’ documentation is fantastic, however commonly you will find yourself needing to go fetch several different documents, rather than just the ‘main feature’ configuration guide you started with. To create this blog, we have used the L2TPv3 Pseudo Wire guide, but also the Bridging guide, and a little part of the IPSEC guide too! To save you a little time we have put links to these guides over on the right of the page.
So lets get the kettle on, and perhaps in just a couple of minutes (with fork at the ready) you will have completed the implementation of your very own ‘Pseudo Noodle Network!’
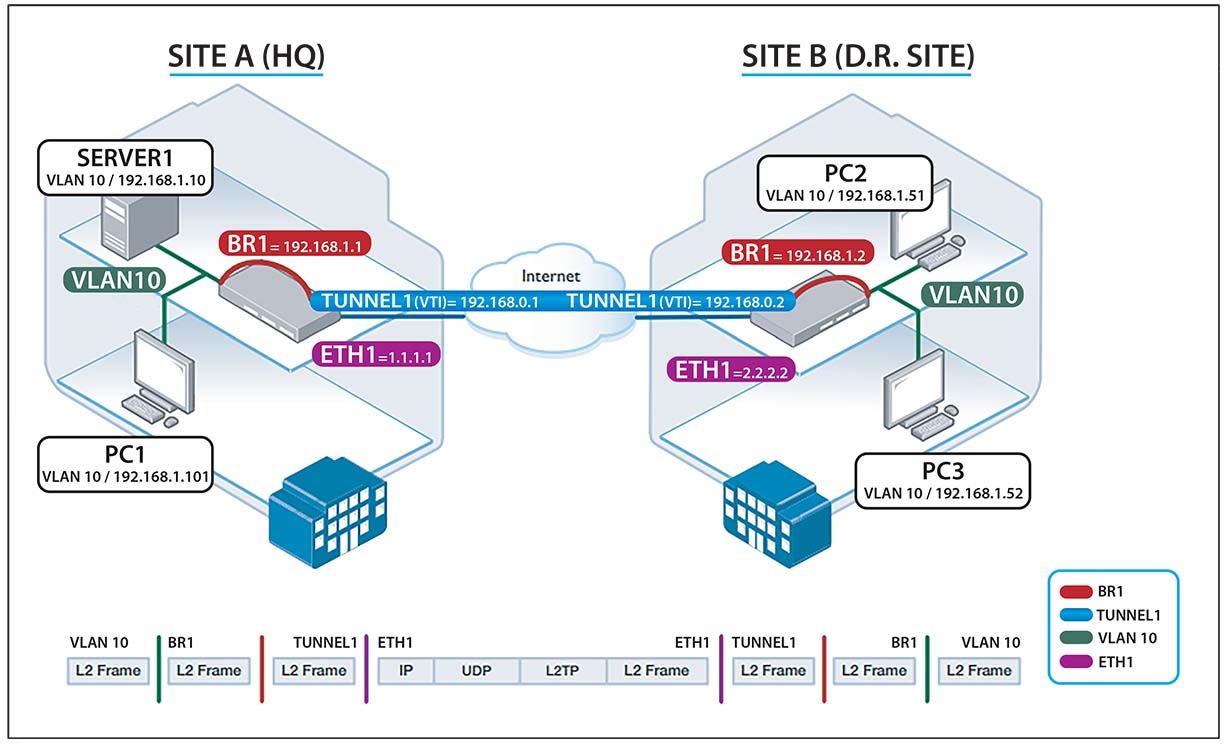
The Objective:
To connect two sites, SITE A (HQ) and SITE B (BACKUP DISASTER RECOVERY SITE), so that PCs and Servers run on the exact same L2 network / IP subnets as if they were all situated on the same network, even though they are 100s of miles apart.
'Ingredients' (minimum requirements)
2 X Allied Telesis AR 2050V Firewalls, one at each site (the smaller, DIN rail mounted / 24v DC powered AR 2010V would also work if you wanted)
2 X Internet connected WAN connections presented as Ethernet (using a PPPoE modem or something similar)
1 X Subnet for the VTI (Virtual Tunnel Interfaces): 192.168.0.0/24
Several VLAN & subnets (or just the one) which you want to ‘stretch’ to / from each site. In our case we are going to stretch the following subnets:
VLAN 10 192.168.1.0/24
VLAN 20 192.168.2.0/24
VLAN 30 192.168.3.0/24
VLAN 40 192.168.4.0/24
Method
1) Basic WAN config, SSH and firmware upgrade
We will first assume you have your WAN connections at each site up and running, presented by the WAN hand off device be it a VDSL modem or something like this presenting as Ethernet. The first thing we need to do is assign the public IP address to the configuration to each AR 2050V devices ‘ETH1’ port:
For our example we are going to use random public IP addresses:
SITE A:
interface eth1
 ip address 1.1.1.1/30
SITE B:
interface eth1
 ip address 2.2.2.2/30
Simple enough.
Plug both in and configure SSH on both, as it will make them easier to manage. Again, a quick and simple enough task on the AR 2050v – it’s simply a case of enabling the SSH service and allowing the ‘manager’ use to use it. Naturally we would recommend create a different user etc and absolutely change the default password!
service ssh
ssh server allow-users manager
Now you should have SSH access to both AR 2050s at SITE A and SITE B.
I would probably advise at this point to upload a recent firmware, which can easily be done now we have the SSH working. I would go with 5.4.8-0.4. Ensure the firmware is uploaded is for the right device (AR 2050V in our case) and then run the ‘boot system ‘firmware.revision.filename’ command to switch firmware and reload both.
Finally, we are going to want to create an IPSEC secured L2TPv3 tunnel, so we need to add a PSK entry for that with the IP address of the other end of the tunnel in each command:
SITE A:
crypto isakmp key PUTYOURKEYHERE address 2.2.2.2
SITE B:
crypto isakmp key PUTYOURKEYHERE address 1.1.1.1
2) Time to get our L2TPv3 Pseudowire up!
With just the WAN interface (and a seriously minimal configuration) we can get our L2TPv3 Pseudowire up and running dead easy:
SITE A:
interface tunnel1
tunnel source 1.1.1.1
 tunnel destination 2.2.2.2
 tunnel local id 77
 tunnel remote id 88
 tunnel protection ipsec
 tunnel mode l2tp v3
 ip address 192.168.0.1/24
SITE B:
interface tunnel1
tunnel source 2.2.2.2
 tunnel destination 1.1.1.1
 tunnel local id 88
 tunnel remote id 77
 tunnel protection ipsec
 tunnel mode l2tp v3
 ip address 192.168.0.2/24
At this point, when logged in to either FW, you will be able to ping the others VTI. So from SITE A, you will be able to ping 192.168.0.2 and from SITE B you can now ping 192.168.0.1
Impressively easy, but not exactly much use.
It’s time we stuck some networks down our noodle!
3) Configure VLANs to be ‘stretched’
For this example, we are going to use a ‘native’ VLAN (VLAN10) to enable us to test the stretch with a simple directly connected laptop at each end. We are then going to run three additional tagged VLANs on top of the native. The VLANs are laid out as follows:
VLAN 10 (native)
VLAN 20, 30, 40 (tagged)
For simplicity sake we are going to run these VLANs on the AR 2050v port1.0.1 of each device.
Add the VLANs to the AR 2050V (same settings for both sites):
vlan database
vlan 10 name VLAN10
vlan 20 name VLAN20
vlan 30 name VLAN30
vlan 40 name VLAN40
Assign the VLANs to port 1.0.1 (again, same settings for both sites):
interface port1.0.1
 switchport
 switchport mode trunk
 switchport trunk allowed vlan add 20,30,40
 switchport trunk native vlan 10
Next we need to tell the Tunnel about the VLANS:
interface tunnel1
 encapsulation dot1q 10
 encapsulation dot1q 20
 encapsulation dot1q 30
 encapsulation dot1q 40
So our tunnel is now configured to pass the VLANs. Getting stuff ‘in’ to the tunnels is going to require bridging…..
Set up the bridges:
bridge 1
bridge 2
bridge 3
bridge 4
Now we need to create the dot1q VLAN interfaces, and assign the corresponding bridge-groups to them:
interface tunnel1.10
bridge-group 1

interface tunnel1.20
bridge-group 2

interface tunnel1.30
 bridge-group 3

interface tunnel1.40
bridge-group 4
A bridge is not a bridge without the other side, so now also assign bridge groups to the appropriate VLANS by creating VLAN interfaces and assigning the bridge groups to these too:
Interface vlan10
Bridge-group 1

Interface vlan20
Bridge-group 2

Interface vlan30
Bridge-group 3

Interface vlan40
Bridge-group 4
Finally, all there is left to do is to create the bridging interfaces that we will use to route our cross site VLAN traffic down the tunnel.
SITE A:
Interface br1
Ip address 192.168.1.1/24

Interface br2
Ip address 192.168.2.1/24

Interface br3
Ip address 192.168.3.1/24

Interface br4
Ip address 192.168.4.1/24
SITE B:
Interface br1
Ip address 192.168.1.2/24

Interface br2
Ip address 192.168.2.2/24

Interface br3
Ip address 192.168.3.2/24

Interface br4
Ip address 192.168.4.2/24
4) Test, serve, and enjoy!
And that is pretty much it.
You can now connect a laptop / PC to port1.01 at SITE A, and configure this on the VLAN10 subnet 192.168.1.0/24 you will now be able to ping / connect to anything on the same subnet over in SITE B.
Then it’s just a matter of connecting a multi VLAN trunked link to port1.0.1 to your switches: VLANs 10,20,30 and 40 will now function cross site, as if they were on the same site.
Further improvements
We resisted the temptation to include a full firewalled setup with this config because we wanted to focus on the Pseudo-wire feature. To secure the firewall but keep the tunnel running, it’s simply a matter of creating entities for your WANs, VTI network and VLANS and making sure you open the appreciate ports (for the L2TPv3 tunnel this will be UDP 1701, UDP 500 for ISAKMP and ESP protocol 50.)
If you get stuck on the firewalling setup, please just drop us a line.
Final notes
Yet again Allied Telesis have included support for an enterprise feature and made it super easy and affordable to roll out. A capability that was previously out of reach of pretty much anyone but large organisations and ISPs is now fully accessible for anyone with two sites to join up and around £600 +VAT.
Home and work? Work and DR? Home and your holiday home in France even!? There are lots of interesting possibilities here!
The benefits multiply when you consider all the other enterprise class features you get with AR rage firewalls only typically found on security appliances that are far costlier. SD-WAN. Policy Based Routing. VRF-Lite. VRRP Trigger / bypass port. It’s a long and impressive list.
Exclusive AR series special offer!
After reading this we hope you will now be considering swapping out your ISP supplied, awful to configure, VDSL router for a simple VDSL modem, and connect this to a highly capable Allied Telesis AR series secure VPN router device. Perhaps we can persuade you to do this by supplying you with some highly competitive pricing? Please consider the following special offers, acquired from Allied Telesis specially for the publication of this blog:
2 X AR 2010V (with 1 year NetCover preferred support included)
Using the smaller AR 2010V would better suit homes / sites with tight comms space requirements, especially where there is an existing 24v DC power source. The AR 2010V does not have quite the same VLAN configuration support as the AR 2050V so probably recommended if you are just needing to stretch a single network. The device has 2 X ETH ports (WAN and LAN) plus a USB which can be used for 3/4G WAN backup. There is also a console port. The product page for the AR 2010V (AKA 'Mighty Maggot') is here, plus we also wrote a blog on the device here too.
OR
2 X AR 2050V (with 1 year NetCover preferred support included)
The hardware used for this example, the product page for this device can be found HERE. The device has 4 x LAN ports, 1 X WAN plus also a handy relay controlled 'bypass' port for the WAN interface which enables a network link pass through in the event of a device failure. We would recommend this product if you are needing to mange multiple VLANs or need the additional interfaces. Also important to bear in mind is that the AR2050V has a rack mount kit option (extra cost), whereas the AR 2010V does not (though you can get DIN rail to 19" kits).
= £ 600 + VAT and delivery (£300+VAT each)
Contact us to place your order HERE.
The only thing NOT impressive about the AR series' L2TPv3 Pseudo-wire functionality is the name. Allied could have come up with something far more creative....
....but then that’s OUR job isn’t it!?
No Comments