
Software Deployment Could Not Be Thinner
Many of FastTrack key features (asset management / inventory, Outlook Signatures etc) deploy seamlessly thanks to FastTrack’s advanced software deployment system. In addition to being able to deploy FastTrack’s own software on PCs and Servers, this same system can be used to package up 3rd party software, and thus FastTrack can be used to manage, install and remote software on systems – in just a few clicks.
FastTrack Automation Studio can deploy and remove software from your clients by simple mouse-clicks. And even better - you do not need any additional infrastructure at all. Yes, you read that right. All you need is the studio installed on your admin computer to configure it. You can also distribute desktop shortcuts and machine-wide registry keys.
No new infrastructure
If you have tried to install Desktop Authority or desktop management solutions like it, you know that the first thing which needs to happen, is that you need to install 25-30 components for it to actually work. You need a web server, a sql server database and a heap of other system components. At this time, you are already thinking there are so many things that can go wrong in the production environment.
We have taken a totally different approach, because we believe simplicity is better. There IS no "management server". Instead, all the work happens on the client and all you are seeing in the logs, are in fact clients working for you. The clever part about our approach is that when you use the software deployment wizard that you see further down, you are not configuring settings in a database. You are in fact building a script for clients based on our core scripting language FastTrack Scripting Host. What is really going on is, when you point and click your way to a configuration setup and save, all you have really done is to write a FastTrack script for clients to execute that you could have written yourself in Scripting Mode. Once you edit the configuration, the wizard simply reads this script back into the GUI. If you have added something manually to this script or modified it in a way that the GUI cannot understand, these portions will simply appear under "custom script" in the left menu and nothing is broken.
The sky's the limit on flexibility
So you are basically "just" writing a script without being directly aware of it. This opens up a whole new world of flexibility. Our core scripting language is the largest in the world and it has a real simple syntax that you can quickly learn. So if you hit the dreaded configuration wall and end up in a place, where the configuration GUI does not suffice, you can just tap down to the "Custom Script" left menu and write a custom snippet. Or you can "take over" script lines built by the GUI and modify to your needs in Scripting Mode. If you have trouble doing that, you can write to our support, which is covered by your license, and we can help you. This Farm App Deployment page covers an example of how to manually write the script to install software and unlock all the 1500 commands of the core language.
No update of clients
We mentioned Desktop Authority in a previous section. If you have ever used it, you will know that one of the pain points of using it, is updates. When there is a new version, you need to update all clients and often this results in manual service of some of them. This doesn't happen here, because you NEVER need to update the clients. Push it out once using a few Group Policy clicks (explained further down) and you never need to touch clients again. So how can we be sure of that? Simple - the clients don't really do anything. The client MSI installs a scheduled task that synchronizes the FastTrack Scripting host engine fsh.exe and a script file from the netlogon folder and executes the script using this engine exe. If you upgrade FastTrack Automation Studio on your admin computer, the engine FSH.exe will automatically update on the network folder, and therefore in turn on all clients.
How it works: Setting up Software Deployment
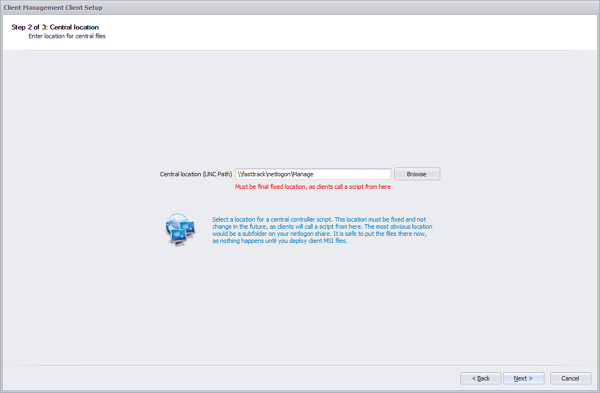
The first thing you need to do, is to set up a client and distribution point. You do this by clicking "Software Deploy" in the App Factory and select "Set Up Client".
As said in the first section, this is an extremely thin client. All it does, is to install a Scheduled Task that will kick off a script from your netlogon share (or another share of your preference) using the engine fsh.exe and the script from this location. At this time, you need to be sure, where you would want to store the central script to control the operation, as this is fixed in the MSI file. We recommend to leave it at the default netlogon share, unless you have reasons not to.
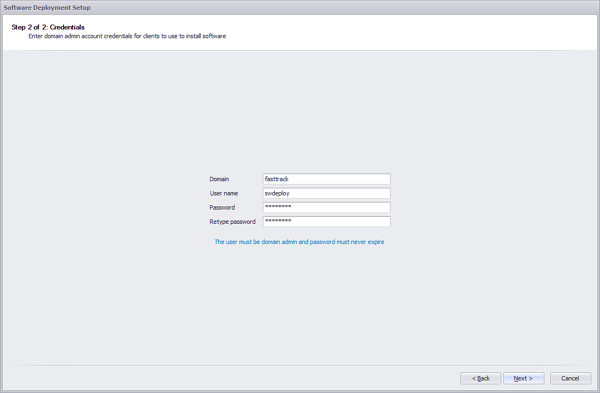
When you get to the next page, you need to enter the
credentials of a domain admin account that is going to perform the operations
on the clients. This user does not necessarily have to be a domain admin, but
the user has to be local administrator and have full control over the central
share location. We recommend that you create a domain admin account for the
purpose and use a long and complex password, because you have to disable
password expiration to avoid having to redeploy the client.
Client deployment
Once you completed the wizard, you end up with an MSI file. You need to deploy this once to clients. At initial testing, simply install the MSI file on a few test machines manually. Observe that if you are using a trial, you will need to recompile the MSI anyway when licensed, because the trial client will otherwise expire. So for trial usage, you should probably stick to manual installation on a few test machines.
Once you have everything in place and you need to install the client on all machines. The easiest way to do that is to use Group Policy. Locate the "Software Installation" policy, as shown below, and browse to the MSI file that you just generated. If you did not change the default location, it will be located at \\<domain>\netlogon\FTClient\FTClient.msi, where <domain> is to be replaced by your actual domain. Group Policy software deployment is not transparent. The only way you will know that clients are actually installed, is to open the App Factory and look at the install log under the "Software Deploy" icon in FastTrack Automation Studio. Once a client Scheduled Task is installed through the MSI file, it will register in the central log.
Configuration
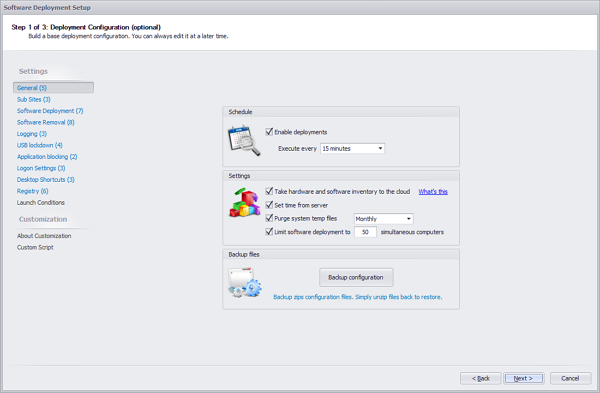
Once you have clients in place, go to the App Factory and click "Software Deploy" again and select "Edit Configuration". If you are familiar with the Logon Script Wizard, you will recognize the layout. To the left, you see a list of overall feature categories. The first and initial category is the "General" page. Here you decide how often clients check for new configurations and execute the script that you are building with the wizard. Note that the wizard can also do other things than deploying software that a machine-wide, such as setting HKEY_LOCAL_MACHINE registry keys and common desktop shortcuts.
Deployment settings decides how many computers may run an installation simultaneously and an option to log installations. Unless you have a large number of computers and you deploy large packages, it is not necessary to use the simultaneous option. If you wonder how this can work without a central state server, this works by clients sharing an XML state file on the netlogon share (or the location you select), so each client knows how many other clients are installing at the time, when a "slot" is needed. The central file, along with log files, are located in the root folder of the central location, you chose. For initial construction, the default 15 minutes is great, but once you are set, there is no need for checking for new software more than say once a day.
Software Deployment
On the "Software Deploy" page you set up software that you would like to install on clients. You simply point to an MSI file on your network using UNC and the GUI will automatically fill in the information. In the case below, we pointed to the Adobe Reader MSI file. Once you click "OK" you will be asked for conditions to install, such as membership of a group or OU. Note that membership and OU here means machine security group and/or OU, as software is machine-wide, not per user. If you select the EXE option, it works the same way, but you have to supply parameters for getting the EXE-based installer to install unattended. If you select the FSH option, you need to point to a FastTrack Scripting Host script that you have built in Scripting Mode to install the software. For example, if you use the exe-to-msi feature in the App Factory to repackage TeamViewer, you might as well fire that FastTrack script directly instead; see TeamViewer page for example.
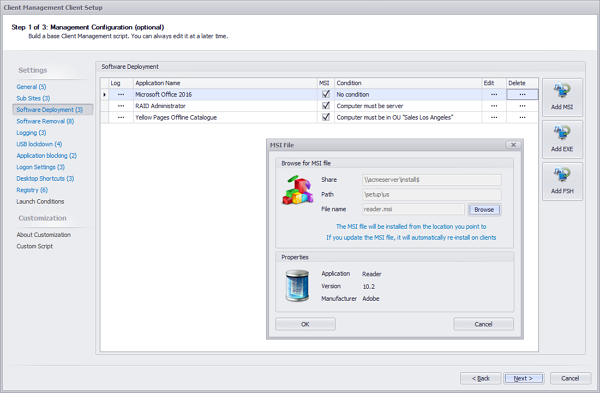
If you use the MSI option, it is NOT a one-time install order. What it does is that when a client executes the script, it will check every time, if the MSI is installed or not, and only install it, if not. The reason why this is important to understand is that it doesn't matter, if some clients already have the software installed, because then nothing happens. It also has two other advantages; one is if the software is uninstalled, it will automatically be re-installed. The other advantage is that you can just update the MSI file on the file server and the version will no longer match = all clients will automatically update to this version, without even opening the wizard again and make a change.
Software Removal
The "Software Removal" feature works in a similar way. It's extremely simple. Just enter the name of anything as it appears in the Windows Control Panel programs list and it will be uninstalled. You can specify the left-most part, but the full name, as it appears in the Windows Control Panel programs list, must be preferred to ensure that nothing gets uninstalled by accident. On the other hand, some programs like Adobe Reader postfixes the version number in the application name, in which case, this can easily be factored in by using "Adobe Reader" as program name, in which case anything that starts with "Adobe Reader" will be un-installed.
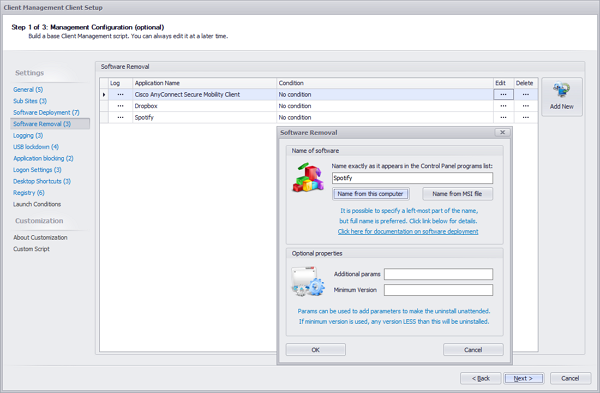
Every time the script is executed, it will check the Windows install list for undesired software. In the case below, we do not want users to use Spotify, so we simply add it to the removal list. If the user installs the software, next time the script is executed, it is removed. Today most users are not local administrators, so the removal part is more useful to you for obsolete software. Let's say for example that the Cisco AnyConnect client is no longer used in the company. Then we can just add it to the removal list, and it will be uninstalled on all clients. You can also uninstall software based on version. Let's say all administrators now use TeamViewer 11, then "TeamViewer" can be added as program to remove and "11" can be used as "Minimum Version". In that case, computers with a lesser version than 11, will get TeamViewer uninstalled. The rest of the menus to the left are reasonably self-explanatory. Note that some non-MSI based installers do not uninstalled without user interaction. Today this would be true for around 10% of the software out there. In such case, you need to find additional parameter for silent uninstall. A good example is TeamViewer. If it was MSI based, it would uninstall unattended, but it will pop-up an uninstall dialog box. If you Google the subject, you will find that you can pass /S to the uninstaller to bypass it, meaning that you must enter /S in the "Additional Params" for TeamViewer to make it work.
Sites
Note in the left menu that you have a menu called "Sub Sites". Let's say you have 4 sites in your company and you know these by IP scopes. Then you can go two ways, either you simply merge everything into one configuration and use the IP scope condition - or you can use "Sub Sites" to create a site configuration for each site based on IP scopes, meaning that on a specific site, the main script is executed plus this sites' "sub site script". A sub site allows you to open the very same Desktop Deployment Builder as you see here, but all settings will then only apply to the site you open.
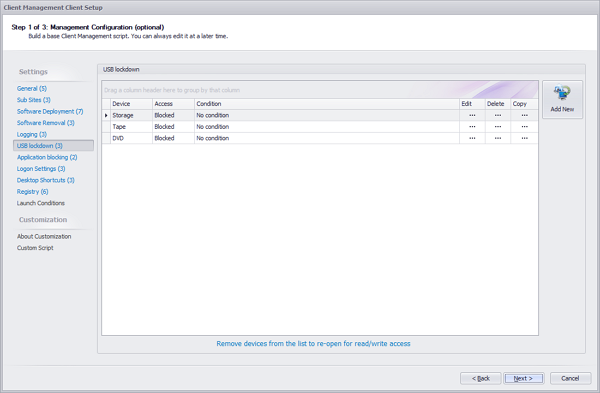
USB lockdown
The software deployment is the main feature of this wizard. But there are other features that can be controlled using the client. You can decide to lock down USB devices based on the type of device. And you can use all the same conditions to filter the locking.
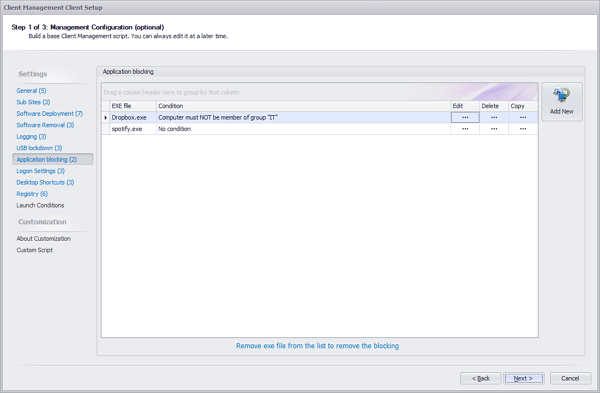
Application lockdown
You can also lockdown applications. If you do not want to uninstall an undesired application, you can choose to lock it down instead. For example, Spotify or Dropbox. You could uninstall it. Or you can lock it down, in case it is actually needed at a later point. This might be pretty easy to decide for Spotify, but you can lock down anything. You can lock down Internet Explorer or another browser for being used or block starting the OneDrive fat application, to control this via the logon script using drive mapping of OneDrive. In such cases an uninstall is not desirable or in some cases even possible.
You can also add registry keys to HEY_LOCAL_MACHINE and place desktop shortcuts on the desktop. A desktop shortcut set per-machine cannot be deleted by the user, versus doing it from the logon script on a per-user basis, so this is typically a better option, unless there is a user condition to place it there.
Testing tip
For initial internal testing, you can avoid waiting the minimum 15 minutes for to test configuration changes. The way you can avoid this, is to select 15 minutes and then log on to any test machine after client install, and locate "FastTrack Management Client" under Scheduled Tasks and run it manually. Setting the interval to 15 minutes disables the timespan check, as the Scheduled Task checks every 15 minutes.
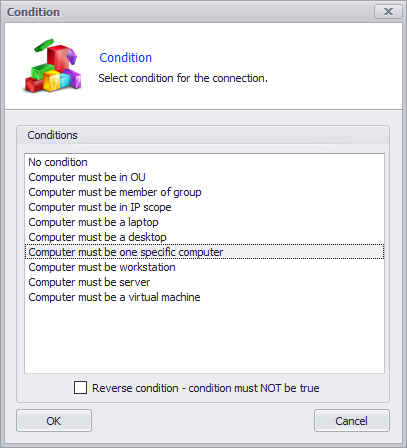
When you are in a production situation and you want to remove or install new software, you can test for one specific machine, so you avoid setting up a test environment. When you add software to remove or install, you are always asked for a condition. You can simply use the "Computer must be one specific computer" condition to make sure that while you test, you only hit that one computer that you test on. Or you could create a computer security group for testing computers and check for that. Once everything is verified, use the edit button and remove the condition.
Post installation tasks
If there is anything you need to do after successful deployment or removal of software, such as updating an inventory you might have, there are two files named PostInstall.fsh and PostUninstall.fsh in the bin folder on the central location. These kick off every time an installation or uninstallation is successful. This is a normal FastTrack script that you modify in Scripting Mode to your needs. The name of the application and the version can be extracted with the functions CurrentInstallName and CurrentInstallVersion.